Professional real estate photography combines preparation, careful shooting, and editing to create accurate marketing visuals. Better source images depend on property preparation, lens choice, lighting, and composition.
This guide explains real estate photography basics, equipment, preparation, and shooting techniques to help photographers and media teams capture better property photos.
What Is Real Estate Photography?
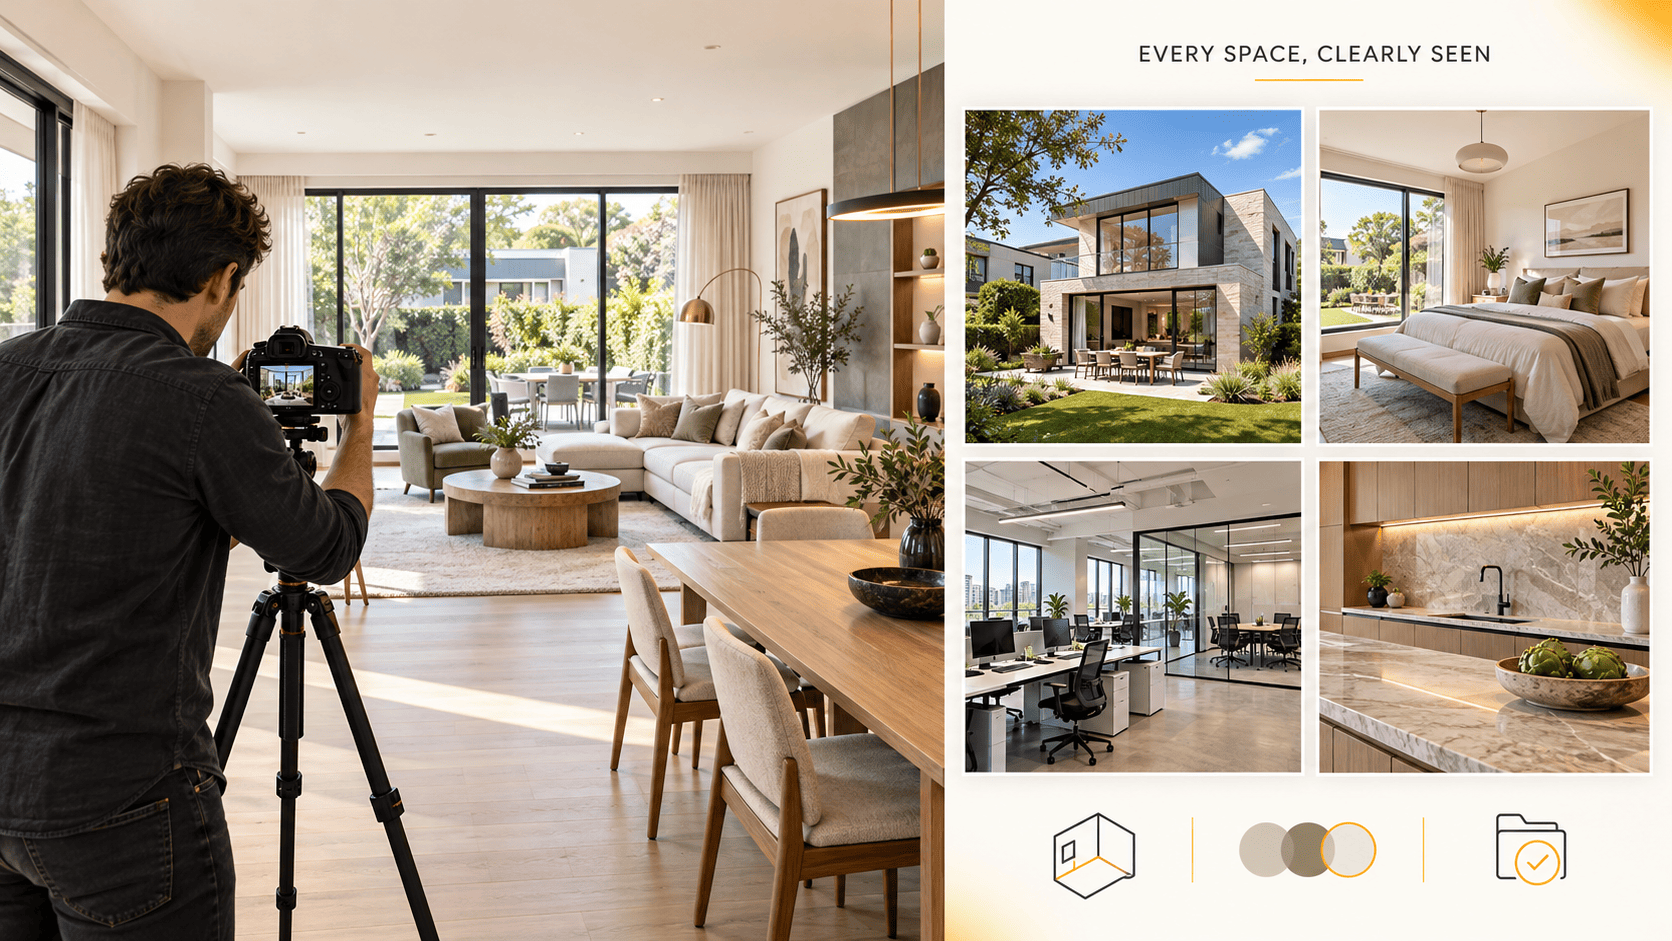
Real estate photography captures residential and commercial properties for sale, rental, or other marketing purposes. Its core purpose is to give prospective buyers or tenants a clear view of a property’s layout, scale, condition, and standout features.
Unlike standalone editorial shots, a successful real estate photography set functions as a cohesive visual sequence. Exterior photos establish context, primary rooms define the layout, secondary spaces complete the flow, and detail shots highlight premium features. Every frame must offer distinct value while maintaining visual consistency across the entire gallery.
Real Estate Photography vs. Architectural Photography
Real estate photography prioritizes comprehensive coverage, efficient workflows, and fast turnaround times so agents can launch listings quickly.
Architectural photography places greater emphasis on design intent and a selective set of carefully composed images. Lighting, staging, and composition are used to showcase architectural and interior design for architects, designers, or hospitality brands. The two fields overlap, but their budgets, timelines, image counts, and intended uses can differ.
Residential and Commercial Property Photography
Residential real estate photography covers single-family homes, apartments, vacation rentals, and new developments. The goal is to capture spatial flow, helping buyers navigate the layout without misrepresenting scale.
Commercial property photography includes offices, retail spaces, hotels, and industrial complexes. These shoots demand detailed planning to capture workspaces, amenities, access points, surrounding infrastructure, and architectural details.
What Professional Real Estate Photos Need to Achieve
Professional photos should show spaces clearly, with true-to-life colors, accurate perspective, and balanced exposure. Edits should highlight property features rather than draw attention to heavy post-processing. Vertical lines should remain straight, blended window views should look natural, and color balance should stay consistent from frame to frame.
Equally important are delivery specs: correct file dimensions, proper naming conventions, and strict adherence to deadlines. Even exceptional real estate photography fails if it misses the client's functional requirements or timeline.
Real Estate Photography Basics
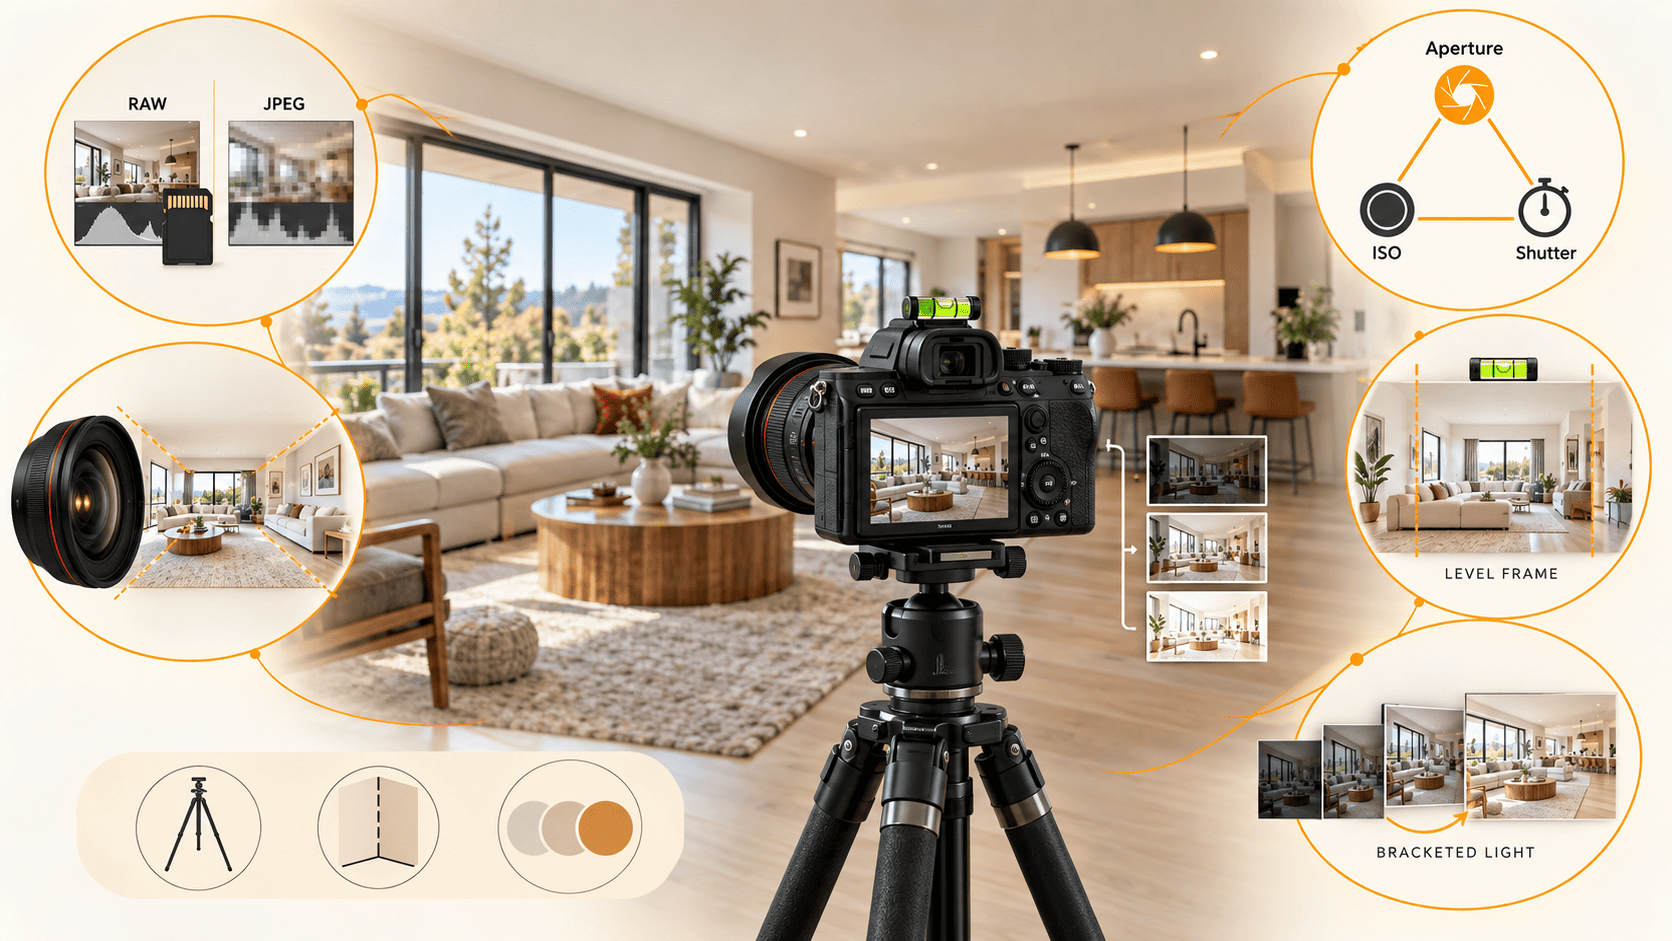
Mastering real estate photography basics comes down to four elements: a stable tripod, exposure control, accurate geometry, and intentional composition. High-end gear offers flexibility, but it cannot compensate for basic mistakes like camera tilt, poor spatial coverage, or uneven lighting.
Camera, Lens, and Tripod
Most modern interchangeable-lens cameras can deliver professional results when paired with an appropriate lens and a sturdy tripod. For online listings, strong dynamic range, reliable exposure bracketing, and clean RAW files matter more than an exceptionally high megapixel count.
A wide-angle lens helps show the layout of a room, but wider isn’t always better. Choose framing that keeps furniture and room dimensions believable. A sturdy tripod helps maintain consistent framing across bracketed exposures; use the camera’s level or a bubble level to check alignment.
RAW vs. JPEG
RAW is generally the better capture format for professional property work because it preserves more image information for exposure recovery, white-balance correction, and localized adjustments. JPEG files are smaller and faster to transfer, but the camera has already processed and compressed much of the underlying data.
Adobe’s guide to RAW and JPEG formats explains why RAW files offer greater post-processing flexibility. JPEG can still be appropriate for a tightly controlled, rapid workflow, but photographers should test the complete process before making it their default.
Aperture, ISO, and Shutter Speed
Aperture, ISO, and shutter speed form the exposure triangle. Adobe’s explanation of the exposure triangle provides a useful technical foundation.
For property interiors, f/7.1 to f/11 can be a useful starting range. Check depth of field and sharpness for the lens, camera, and room before settling on an aperture, since very small apertures can reduce detail through diffraction. Keep ISO low when practical, and adjust shutter speed for the required exposure or bracket sequence. Moving subjects may require a faster shutter speed.
These values are starting points rather than universal rules. A dark room, moving curtains, exterior foliage, or a handheld detail shot may require a different balance.
Camera Height and Straight Vertical Lines
Adjust the camera height to suit the space. Chest level can be a useful starting point, but kitchens, bathrooms, and rooms with low-profile furniture need individual adjustments so important surfaces remain visible and proportions look natural. Keep the camera level to maintain straight vertical lines on walls, doors, and cabinetry.
Tilting the camera up or down causes converging verticals. Correcting them in software can crop the frame and alter proportions near the edges, so begin with level framing.
Lighting, Dynamic Range, and White Balance
Bright windows and shadowed walls can exceed the dynamic range captured in a single exposure. Depending on the scene, photographers use bracketed HDR, flash, or flambient methods. HDR blends exposures taken at different brightness levels; flambient combines flash and ambient exposures during editing.
Mixed lighting from daylight, tungsten bulbs, and LEDs can create unwanted color casts. Shoot RAW to preserve editing flexibility. Depending on the chosen lighting method, consider turning off conflicting fixtures or capturing a flash frame, an exposure lit with flash that can be blended with an ambient exposure.
Essential Real Estate Photography Equipment
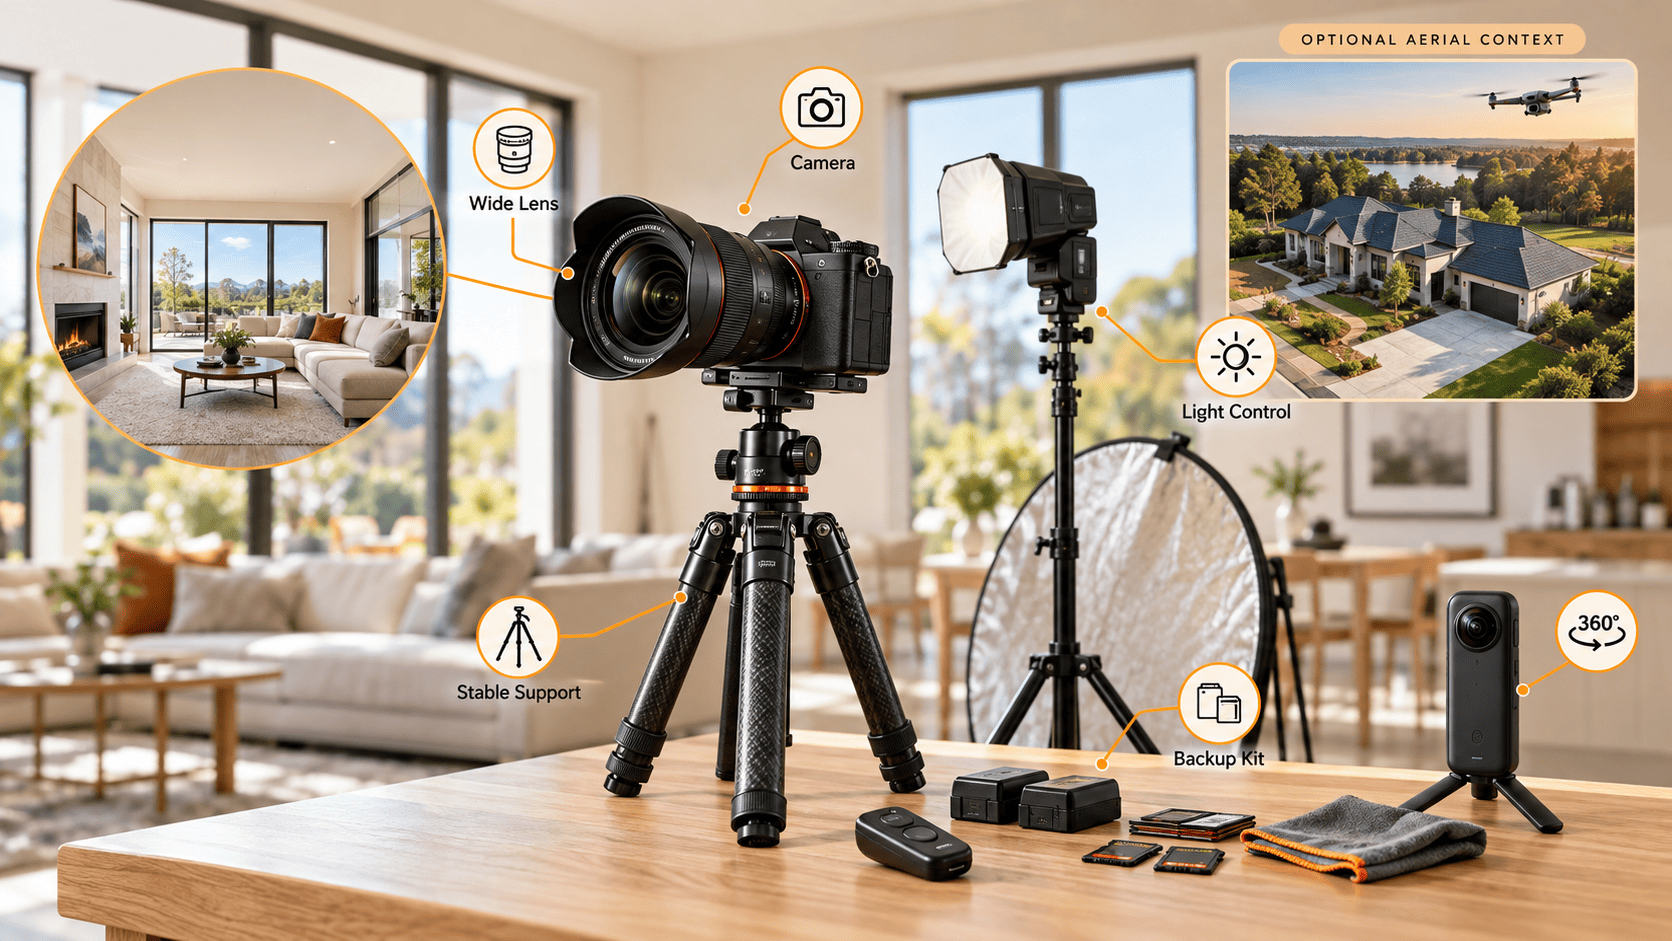
The best equipment is the kit a photographer can operate quickly and consistently. Reliability matters more than carrying every available lens or accessory to each property.
Choosing a Camera
A suitable camera should provide manual exposure control, RAW capture, dependable autofocus, and exposure bracketing. Full-frame cameras offer greater wide-angle lens choice and strong low-light performance, but APS-C cameras can also deliver professional results with an appropriate lens.
Dual card slots, long battery life, and tethering can improve reliability for high-volume or high-value assignments, but they are not prerequisites for learning the craft.
Choosing a Wide-Angle Lens
A 16–35mm zoom is a practical starting option for full-frame interior photography, while a 10–24mm lens offers a broadly comparable range on many APS-C cameras. Exterior shots may benefit from a longer focal length. Choose the focal length based on room size, sensor format, shooting distance, and composition.
Use ultra-wide focal lengths with caution. Objects near the edges can appear stretched, and excessive foreground space can weaken the composition. Adjust your tripod position and refine the framing before defaulting to the widest setting.
Tripods, Remote Shutters, and Backup Equipment
A tripod keeps the camera stable during longer exposures and helps maintain consistent framing for brackets. A two-second timer or remote release reduces shake caused by pressing the shutter button.
Bring spare batteries, memory cards, and lens cloths. Consider a backup camera body or lens for assignments where equipment failure would jeopardize delivery.
Flash, Light Stands, and Reflectors
Off-camera speedlights or strobes can help reduce color casts and render surface colors more accurately. Preserving window detail also depends on exposure control and blending. A simple flash setup may be enough for a small room; larger interiors may benefit from multiple flash exposures that are blended during editing.
Master a repeatable lighting setup before buying complex gear. Adding more lights won’t automatically improve the result. If your method uses separate flash exposures, those files will require careful blending in post-production.
Optional Drone and 360-Degree Equipment
Drones can show lot shape, access, nearby features, and the relationship between a property and its surroundings. In the United States, commercial drone work generally falls under the FAA’s Small UAS Rule. The FAA explains the certification process on its official page for becoming a certificated remote pilot.
Drone photographers must also check airspace, operating restrictions property access, and local requirements before flying. Aerial imagery should be used when it adds useful context, not simply because a drone is available.
360-degree cameras and scanning systems serve a different purpose by supporting virtual tours or digital twins. They can complement still photography, but they require their own capture and delivery workflow.
Read more: The Essential Guide to Expert Real Estate Drone Photography
How to Prepare for a Real Estate Photography Shoot
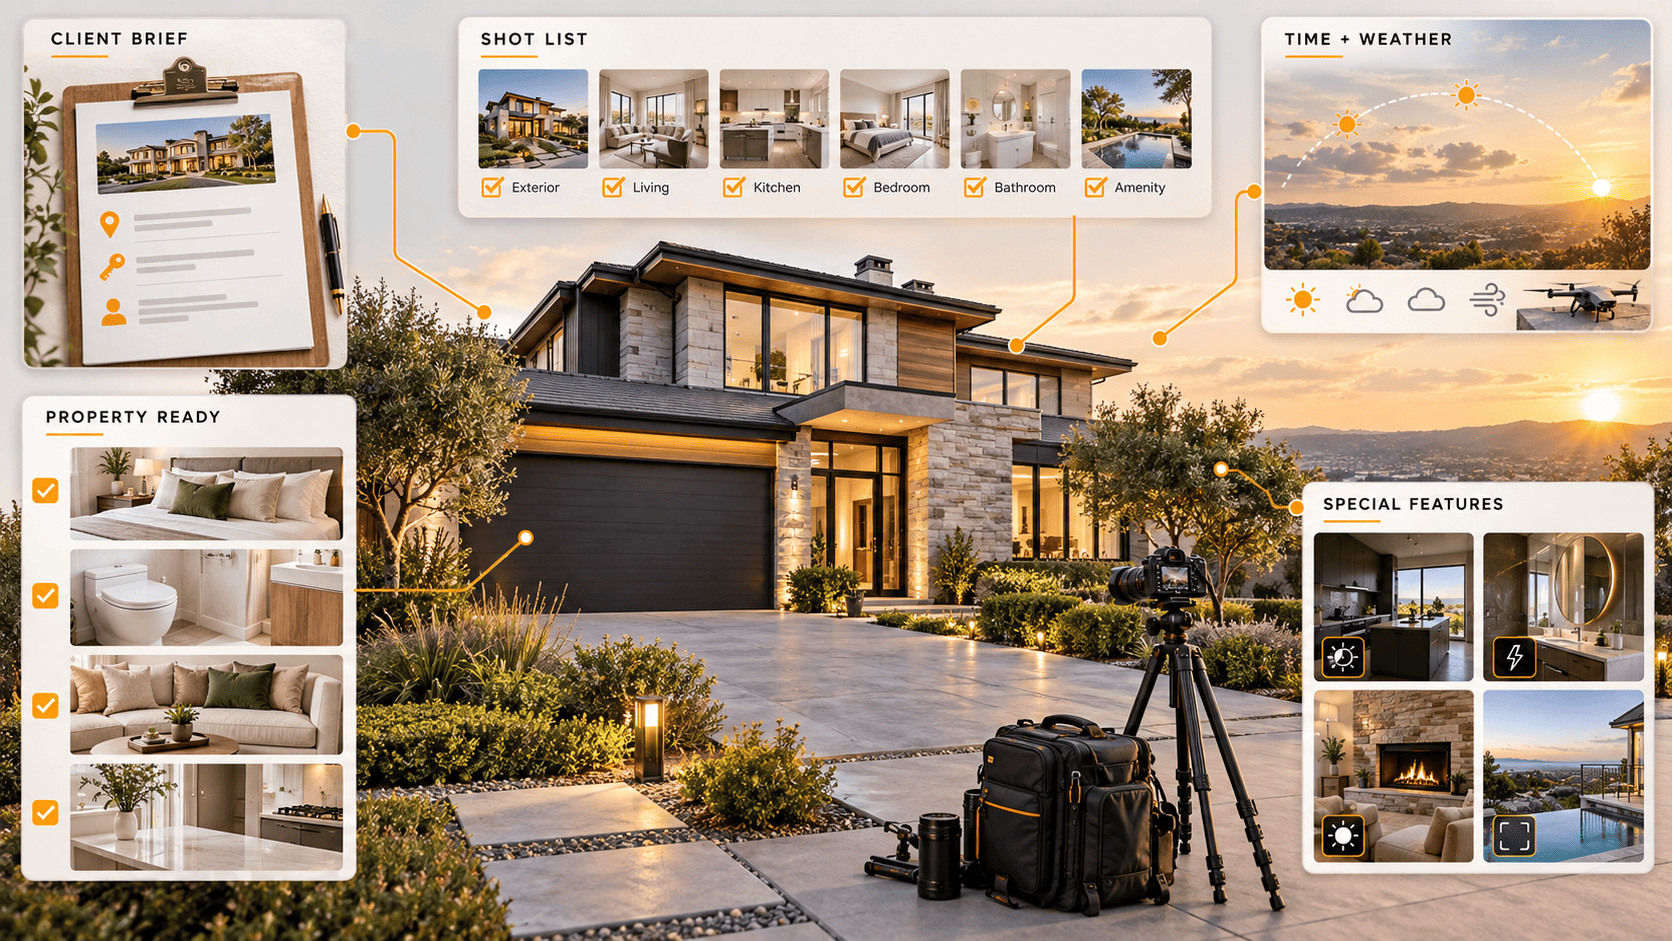
Preparation reduces the amount of time spent fixing avoidable problems on site. It also prevents disagreements about missing rooms, image count, or additional services after the shoot.
Confirm the Client Brief and Deliverables
Before starting any property photography project, confirm the address, access instructions, point of contact, and scope of work. The brief should clarify whether the shoot requires only still photos or extra deliverables like drone visuals, twilights, video walkthroughs, floor plans, or virtual tours.
Confirm expected photo count, turnaround time, delivery specs, and special requests. If the client needs specific hero shots, build them directly into your shot list.
Prepare a Property Photography Shot List
A baseline shot list includes front and rear exteriors, primary living spaces, kitchens, bedrooms, bathrooms, and key amenities. Adjust it to suit each property.
For larger homes, plan a sequence that shows how the rooms connect. Smaller properties may need fewer angles, but each image should add useful information. Avoid redundant coverage to reduce culling and editing without leaving gaps in the listing.
Check the Property Before the Shoot
Ask clients to complete cleaning and basic staging before the photographer arrives. Provide a preparation checklist covering visible trash bins, toilet lids, cords, bedding, curtains, and furniture placement so avoidable distractions are addressed before the appointment.
Make clear to clients that moving heavy furniture and providing full staging are outside the agreed scope unless separately arranged. Setting these expectations early helps keep the shoot on schedule.
Choose the Best Time and Weather
Timing exterior shoots requires accounting for sun position, facade orientation, and shadows from surrounding structures or trees. Early morning and late afternoon offer softer light than midday sun, but the ideal window depends on which elevation takes priority.
Weather conditions affect aerial capture, exterior reflections, foliage movement, and window visibility. When rescheduling isn’t an option, aim to capture technically sound RAW files as a starting point for post-processing. Sky replacement can change the appearance of the sky, but it cannot correct every problem caused by poor shooting conditions.
Plan for Special Features and Difficult Rooms
Make a note of rooms with dark finishes, bright windows, mirrors, glossy cabinets, or complex lighting. These spaces may need extra brackets, a flash frame, or a different shooting method.
Features such as a view, fireplace, pool, balcony, or custom kitchen should receive deliberate coverage. The goal is not to photograph every object but to document the characteristics that distinguish the property.
How to Take Real Estate Photos Step by Step
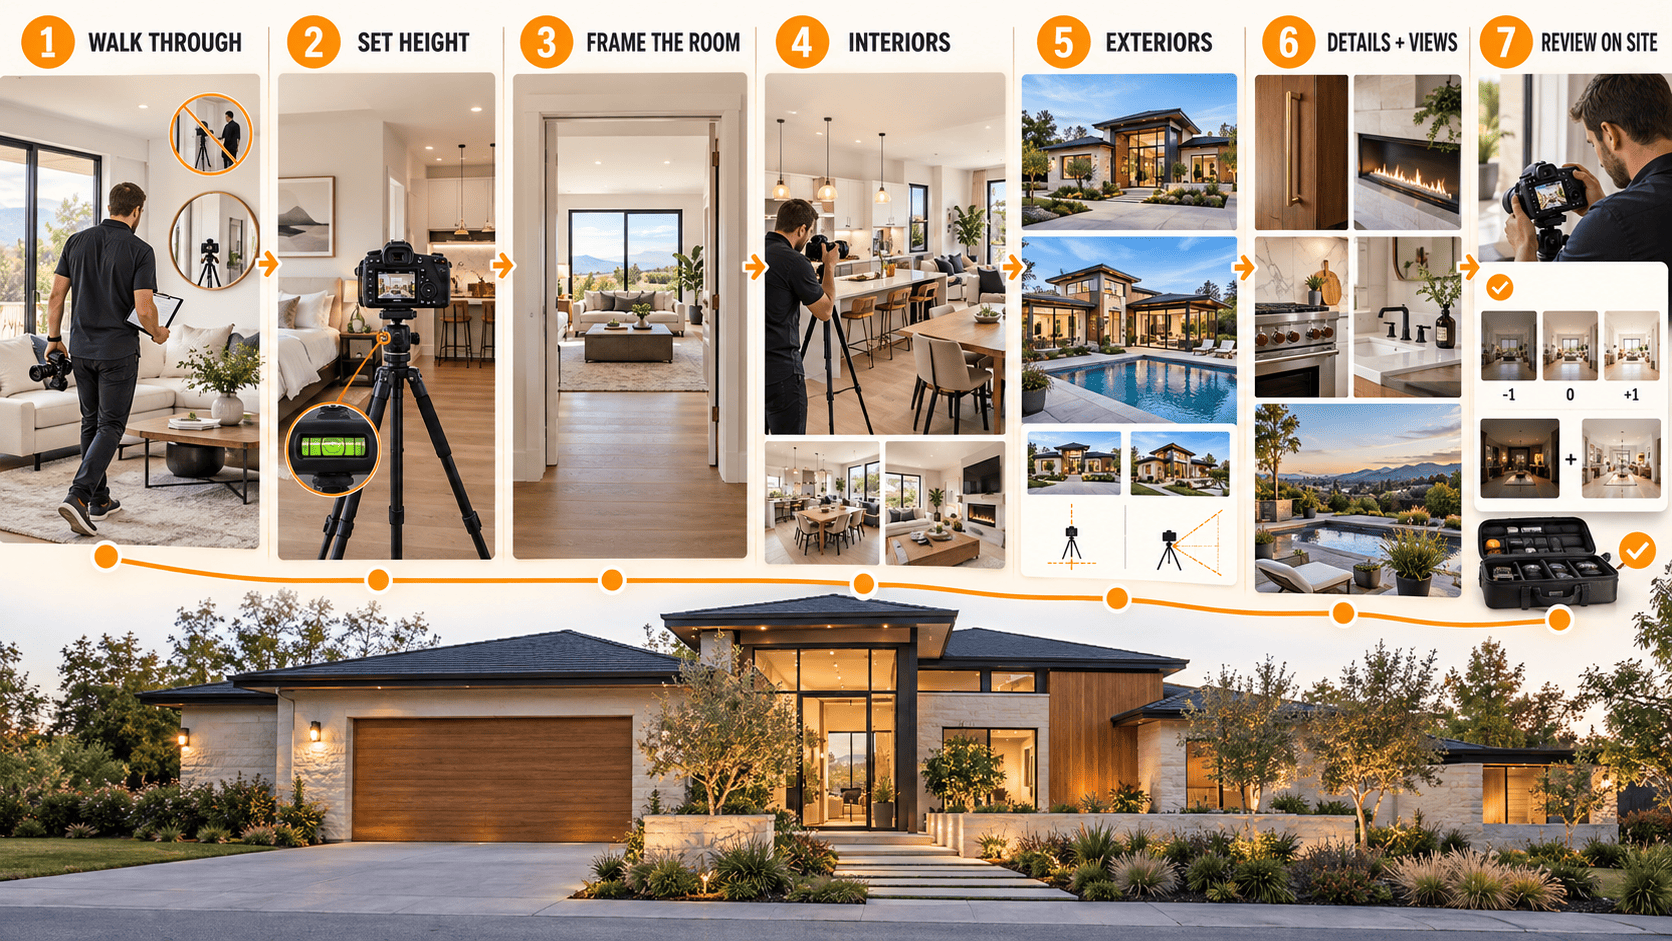
Learning how to take real estate photos is easier when every property follows the same basic sequence. A repeatable order reduces missed spaces and makes file review more efficient.
Walk Through the Property Before Shooting
Begin with a thorough walkthrough of the property. Identify standout features, verify room readiness, and flag any issues requiring client approval. Decide on exact camera placements before setting up your tripod.
During the walkthrough, inspect mirrors, windows, and other reflective surfaces. Choose camera and lighting positions that avoid capturing reflections of yourself or your equipment.
Position the Camera at a Natural Height
Set the camera at a height that balances the floor, furniture, and ceiling. In most rooms, the lens should not feel as though it is looking down from above or up from the floor.
Adjust the height when counters, tables, beds, or railings dominate the composition. Keep the camera level and refine the tripod position before relying on perspective correction.
Compose Each Room Clearly
Select angles that demonstrate room functionality and spatial flow. Framing sightlines through doorways helps buyers map the layout, but overusing framed shots makes galleries repetitive.
Two-wall compositions can offer a balanced presentation, while three-wall views can show more of the room’s depth. Neither guarantees accurate proportions: camera position, focal length, and tilt all matter. Adapt the framing to the room’s layout rather than relying on a rigid formula.
Photograph Interior Spaces
Work through the property methodically. Capture the primary angle first, then add a secondary angle only when it reveals useful information. Check furniture edges, curtains, doors, reflections, and window exposure before moving on.
For open-plan areas, create a sequence that shows how the kitchen, dining, and living spaces relate. Avoid turning every connected area into an isolated room.
Photograph the Exterior
Capture the front, rear, and key outdoor living spaces. Keep building verticals perfectly straight and move vehicles, trash cans, or temporary clutter out of view whenever practical.
An angled exterior shot highlights architectural depth, while a straight-on view emphasizes symmetry. Choose the angle based on the property’s features, lot shape, and surrounding structures.
Capture Details, Amenities, and Views
Detail and vignette shots add value by highlighting features that wide angles miss—such as high-end appliances, custom finishes, built-in cabinetry, fireplaces, outdoor kitchens, or scenic views.
Use detail shots to supplement overall room coverage. Keep enough wider views for prospective buyers or tenants to understand the layout.
Review Every Image Before Leaving
Before packing up gear, review your shot list and inspect image files on site for sharpness, exposure, vertical alignment, and unwanted reflections. Verify that all bracketed exposure sets and flambient source frames are complete.
Post-processing cannot reliably recover missing coverage or incorrect focus. Complete the on-site review before leaving so capture problems can be corrected while the property is still accessible.
Common Real Estate Photography Mistakes
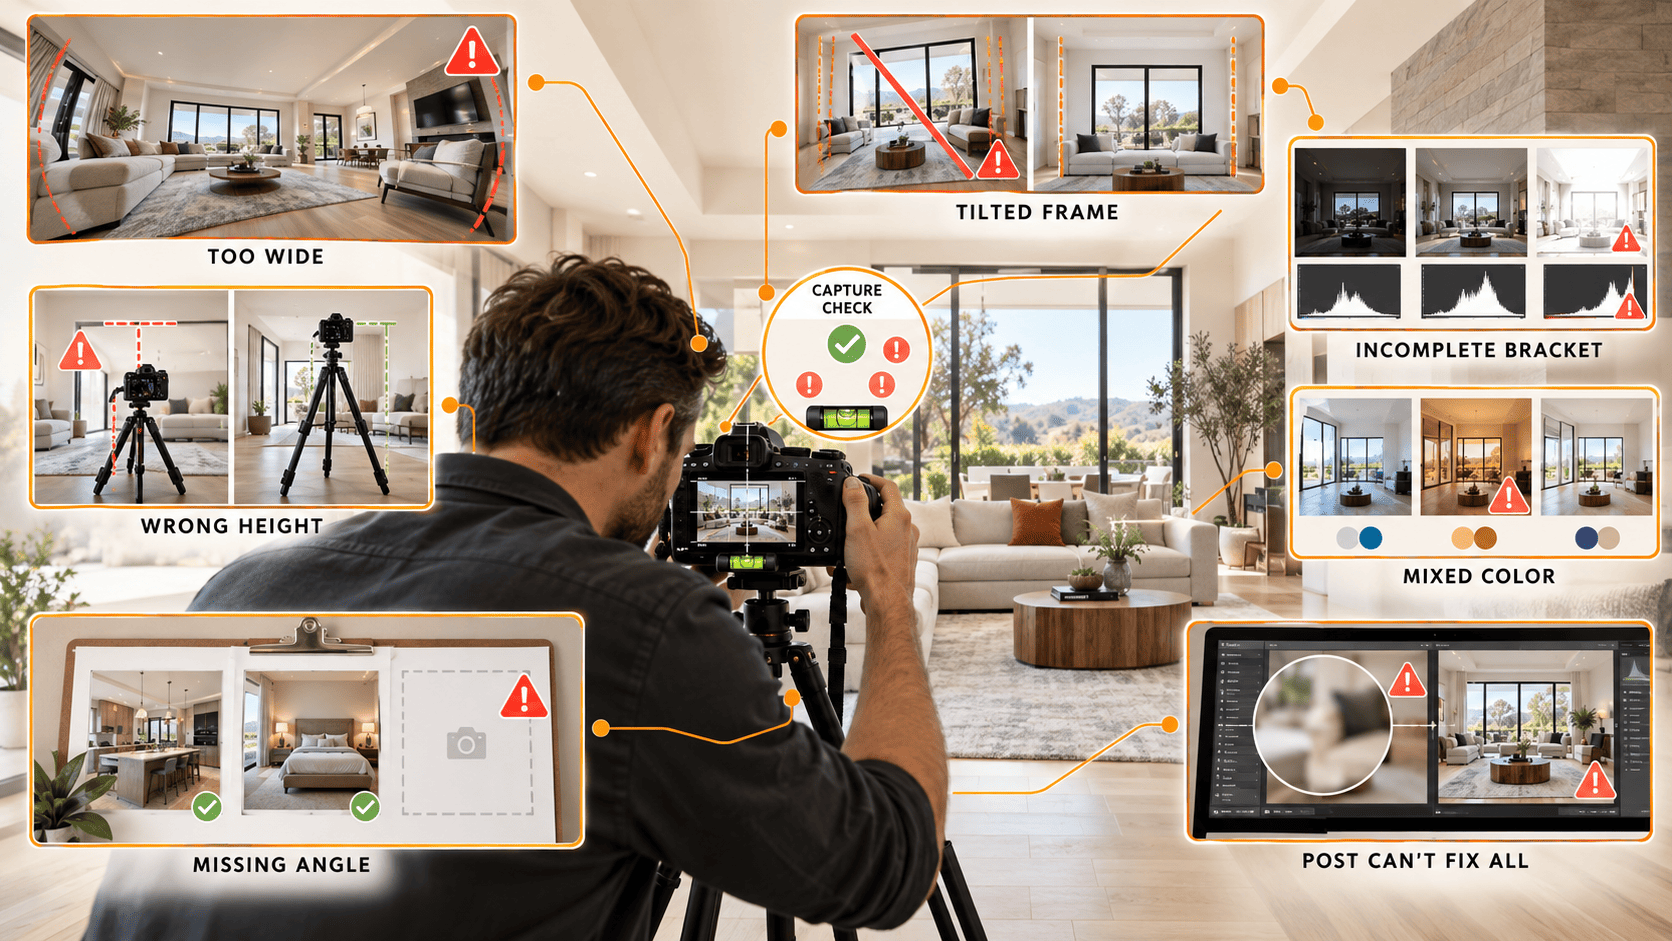
Most recurring problems begin during capture and become more expensive during editing. A reliable workflow is designed to prevent them rather than repeatedly repair them.
Using an Overly Wide Lens
Excessive width stretches objects near the edges and makes the room appear larger than it is. Select the composition first, then use only as much width as necessary to explain the space.
Shooting from the Wrong Height
Check whether the camera height hides important surfaces or creates an awkward balance of floor, furniture, and ceiling. Adjust it for the room rather than using one height throughout the property.
Tilting the Camera
Tilting creates converging lines and increases the crop required in post-production. Use the camera level, grid, and tripod adjustments before changing the lens angle.
Capturing Too Few Exposures
If the darkest frame still clips the window or the brightest frame does not contain clean interior shadow detail, the bracket range is incomplete. Review the histogram and the actual frames on site.
Ignoring Mixed White Balance
Automatic white balance can vary between images or bracket frames, while mixed light sources can create localized casts. Keep capture settings consistent where practical and choose a deliberate lighting approach for each room.
Missing Essential Property Angles
No amount of editing can replace a missing kitchen, bedroom, or exterior view. Use a shot list, then complete a final walkthrough before leaving.
Relying on Post-Production to Fix Capture Problems
Editing can correct exposure, color, and minor perspective errors. It cannot reliably recover detail lost to severe clipping, motion blur, or incorrect focus, or reveal a layout hidden by the composition. Capture and post-production should support each other.
Frequently Asked Questions About Real Estate Photography
1. How to start in real estate photography?
Equip a manual camera with RAW capability, an ultra-wide lens, and a sturdy tripod. Prep the space, follow a shot list, level your camera, and post-process for a cohesive look.
2. What are the best camera settings for real estate photography?
Set base ISO, f/8 aperture, and adjust shutter speed on a tripod. Use exposure bracketing whenever scene contrast exceeds single-frame range.
3. How many bracketed exposures are needed?
A 3-frame sequence (-2, 0, +2 EV) is standard. Add exposures only to preserve blown-out window views or deep interior shadows.
4. Should interior lights be on or off?
Lights on add warmth; lights off eliminate mixed-color casts. Choose based on property aesthetics and client goals.
5. How many photos per real estate photography listing?
Provide enough images to convey the full layout without redundant angles. Align deliverable counts with client needs and platform requirements.
6. Best time of day for real estate photography?
Shoot exteriors when sunlight hits the main facade directly. Avoid harsh sun beams inside. Twilight shoots require tight timing right around sunset.
7. Is post-processing required?
Yes. Editing balances exposures, blends HDR, corrects colors, and fixes vertical lines. However, it cannot rescue missed focus or clipped highlights.
Conclusion
Better real estate photography starts with consistent preparation, controlled exposure, level framing, and clear coverage of each space. Review the source images before leaving the property to catch missing angles and capture errors. A repeatable shooting process gives editors cleaner files and supports a more consistent listing gallery.
When editing becomes a production bottleneck, specialized post-processing support can help relieve it. Rotider helps real estate photographers and media teams scale production by turning organized source files into polished, listing-ready photo galleries, with human quality control before delivery.
.png)
.webp)