The best focal length for real estate photography depends on the space, your camera’s sensor and what the photograph needs to show. A small bathroom requires different coverage from an exterior facade or a close-up of custom cabinetry.
This guide explains practical starting ranges, how to compare them across camera formats and how to choose a composition that communicates the property clearly.
What Is the Best Focal Length for Real Estate Photography?
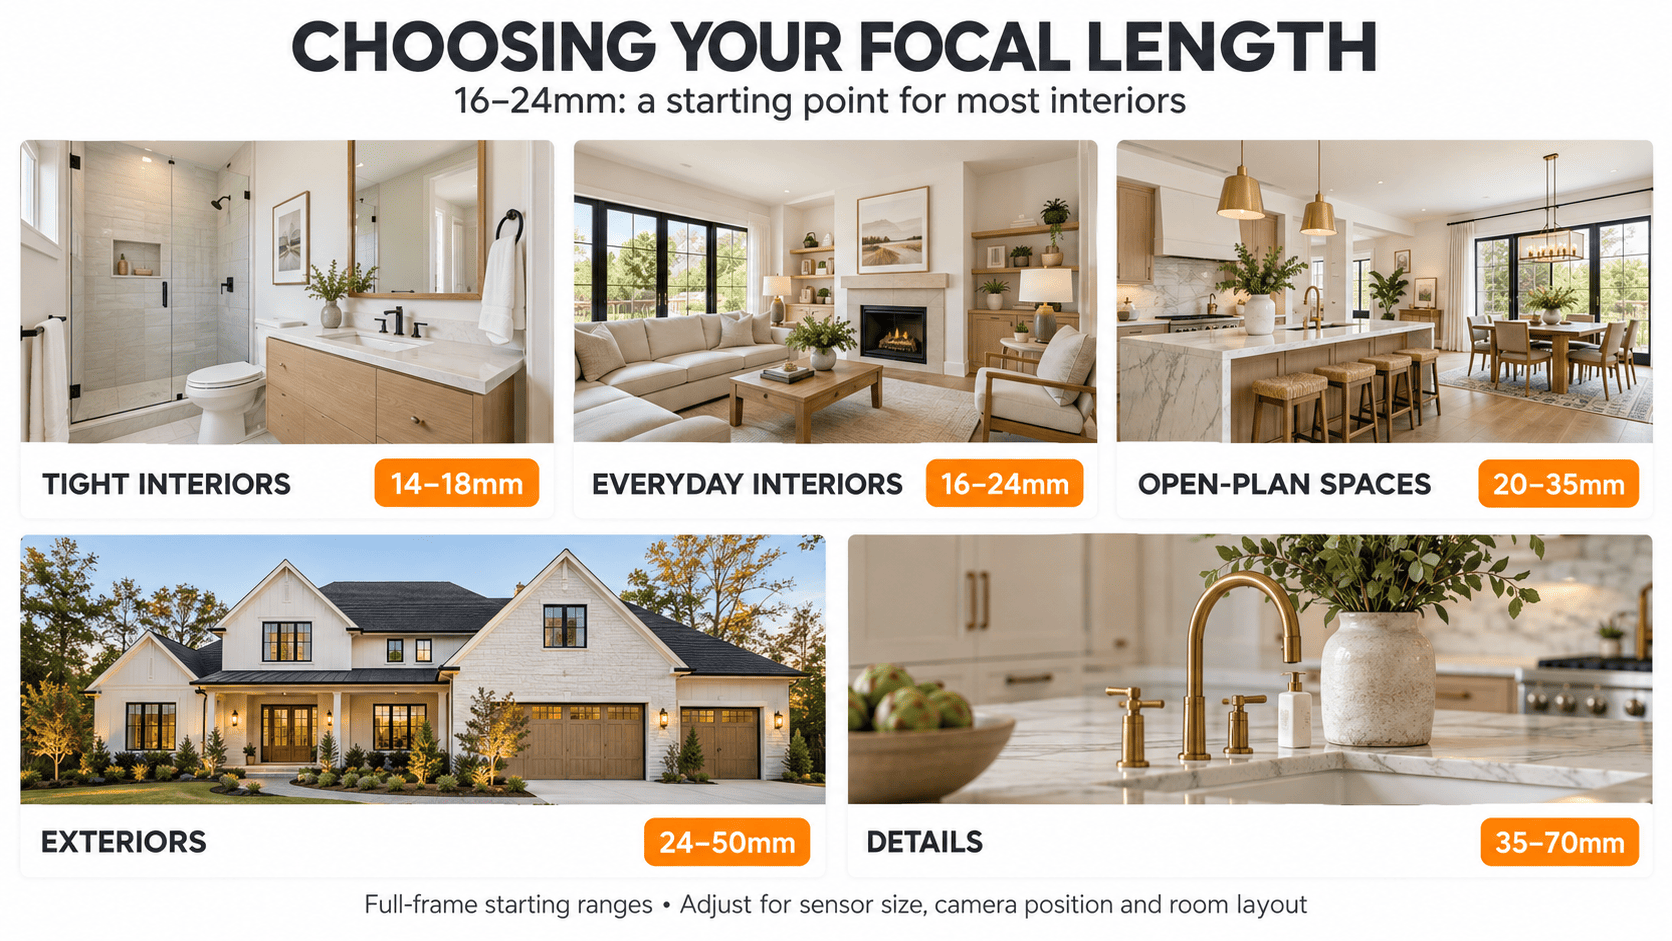
For many interiors, 16–24 mm on a full-frame camera is a useful starting range. Around 14–18 mm can help in confined spaces, while longer focal lengths suit more selective compositions when working distance permits.
Treat these ranges as starting points to test on location, not universal industry standards. The appropriate focal length depends on camera position, room layout, and the features the image needs to show.
The goal isn’t to squeeze every wall into one photograph. It is to explain the room’s layout, show its important features, and maintain realistic proportions. Often, two well-composed shots explain a space better than one extremely wide view.
When deciding how wide to shoot for real estate photography, account for sensor size: a 16 mm lens provides a wider field of view on full frame than on APS-C. Nikon’s guide to focal length explains the relationship between focal length and angle of view.
|
Property shot |
Full-frame starting range |
Main consideration |
|
Compact bathroom or tight interior |
Approximately 14–18mm |
Include essential features without oversized foreground objects |
|
Typical bedroom, kitchen or living room |
Approximately 16–24mm |
Show layout and maintain balanced framing |
|
Large room or open-plan space |
Approximately 20–35mm |
Avoid including unnecessary empty space |
|
Exterior or front facade |
Approximately 24–50mm where distance permits |
Fit the building while controlling foreground and obstructions |
|
Materials, fixtures and architectural details |
Approximately 35–70mm |
Isolate the feature and show its context |
These ranges are editorial recommendations for testing on location, not universal industry standards. All refer to full-frame focal lengths; smaller sensors require equivalent coverage.
Recommended Focal Lengths by Property Shot
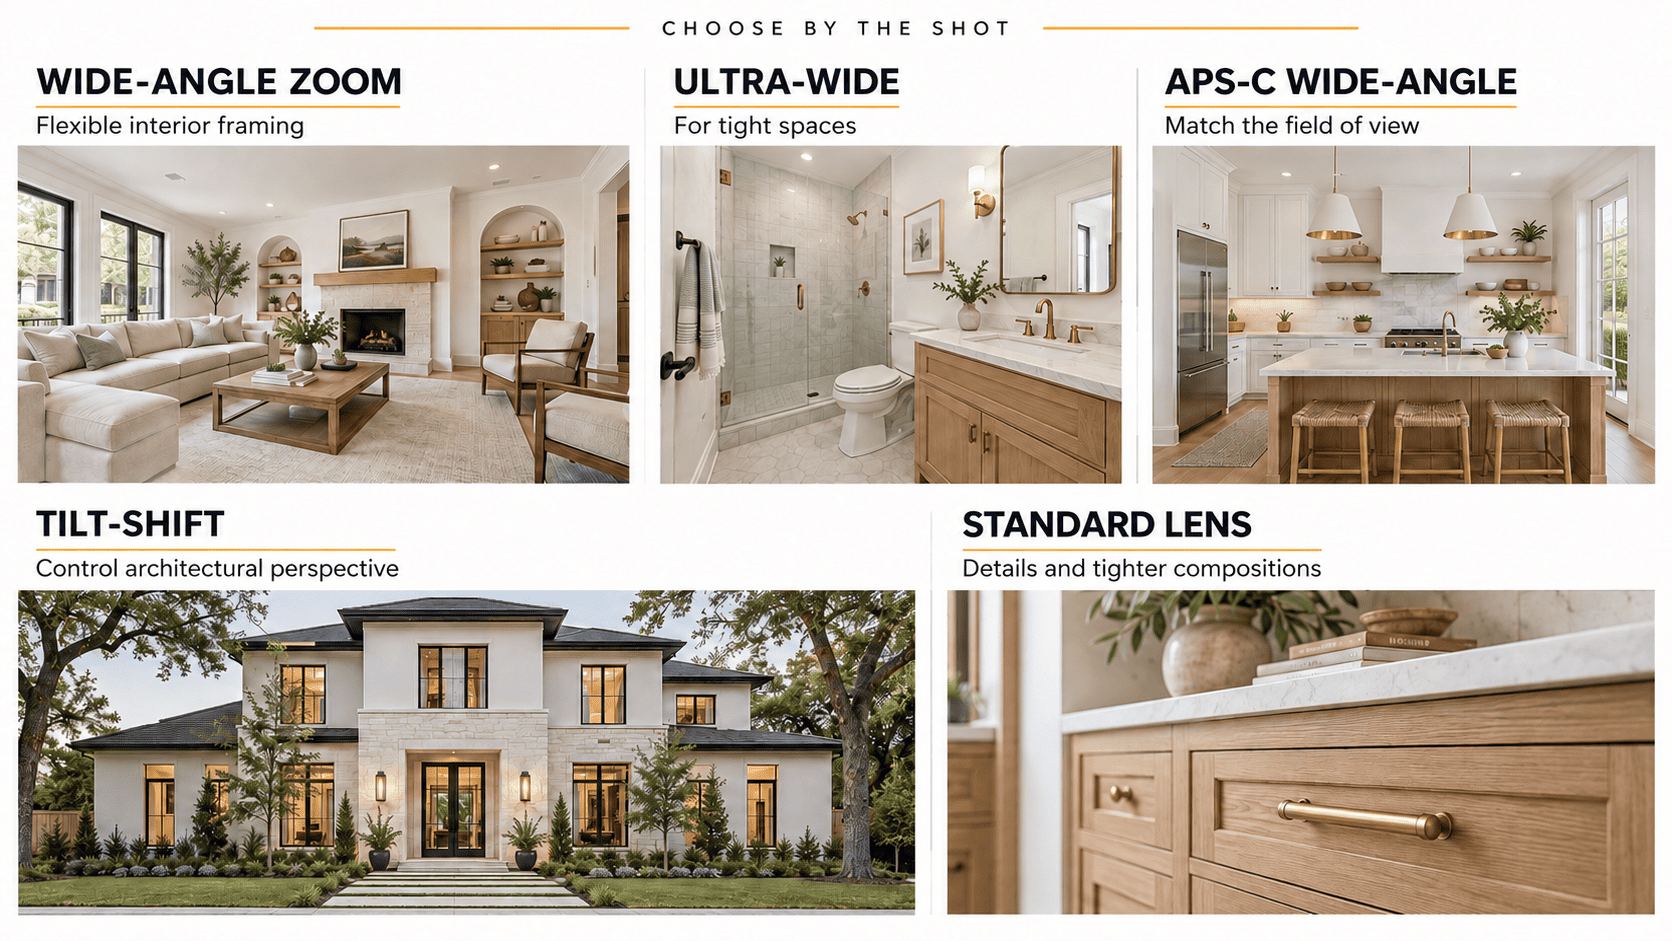
Your real estate photography focal length should match the composition, available camera position, and sensor format. Consider room size, doorway access, furniture placement, reflections, and the distance to foreground objects.
Wide Focal Lengths for Confined Spaces
On full frame, 14–18 mm can provide useful coverage in confined rooms. When you cannot step back, a wider field of view can help include vanities, shower areas, and other essential features.
Start by testing accessible positions, including the doorway where appropriate. Check for unwanted mirror reflections, and avoid placing sinks, toilets, or countertops too close to the lens.
From the same position on full frame, a 14 mm rectilinear lens includes more of the scene than a 16 mm lens. That extra coverage can help when placement is restricted, but may include distracting edge content. Compare corrected framing and choose the view that shows essential features clearly. A single image does not need to show the entire bathroom.
Versatile Focal Lengths for Standard Interiors
For medium-sized rooms, a 16–24mm focal range on full-frame offers a practical balance between broad coverage and framing flexibility. Wider settings help show how furniture connects across the room, while tighter settings let you crop out distracting edge elements.
In bedrooms, monitor the distance between the camera and the bed. In kitchens, check if the island visually dominates the foreground. For living spaces, retain enough context to illustrate pathways and seating layouts without causing nearby furniture to look unnaturally oversized.
When space permits, test a slightly tighter focal length before settling on the widest option. Evaluate the actual composition rather than assuming a wider angle always produces a better image.
Moderate Wide Angles for Expansive Spaces
In larger spaces, around 20–35 mm on full frame can provide useful coverage when the available working distance permits.
For open-plan layouts, consider multiple shots with distinct goals: an establishing view showing spatial connections, a tighter composition centered on the kitchen, and another highlighting the living area.
Using an ultra-wide angle for every shot can flood the frame with excessive floor, ceiling, or dead space. Choose your focal length intentionally so that each image adds meaningful value to the overall shoot package.
Wider to Standard Focal Lengths for Exterior Views
Exterior photography depends heavily on the available physical distance. When space permits stepping back, a 24–50mm focal range on full-frame offers effective compositional choices. In narrow streets flanked by trees, parked vehicles, or tall facades, a wider optic becomes necessary.
The visual relationship between near and far elements changes with camera position. A longer focal length does not automatically render a facade more accurately. To keep the building similarly sized in the frame at a longer focal length, you generally need to move farther away.
Keep the camera level whenever possible while managing the amount of street, driveway, or landscaping in the frame. The primary image should feature the building clearly without allowing foreground elements to dominate the view.
Standard to Short Telephoto Focal Lengths for Property Details
On full frame, 35–70 mm can be useful for finishes, fixtures, and architectural details, depending on working distance and the amount of context required.
A detail shot of a faucet serves a distinct purpose compared to a photo capturing a custom vanity setup. Opt for a tighter crop to emphasize texture or craftsmanship, and use a wider view when demonstrating how that feature connects to the room as a whole.
Detail photos should complement, rather than replace, establishing room shots. A collection of close-up finish details cannot substitute for primary images that clearly explain the layout and flow of a property.
Full-Frame, APS-C and Micro Four Thirds Focal Lengths
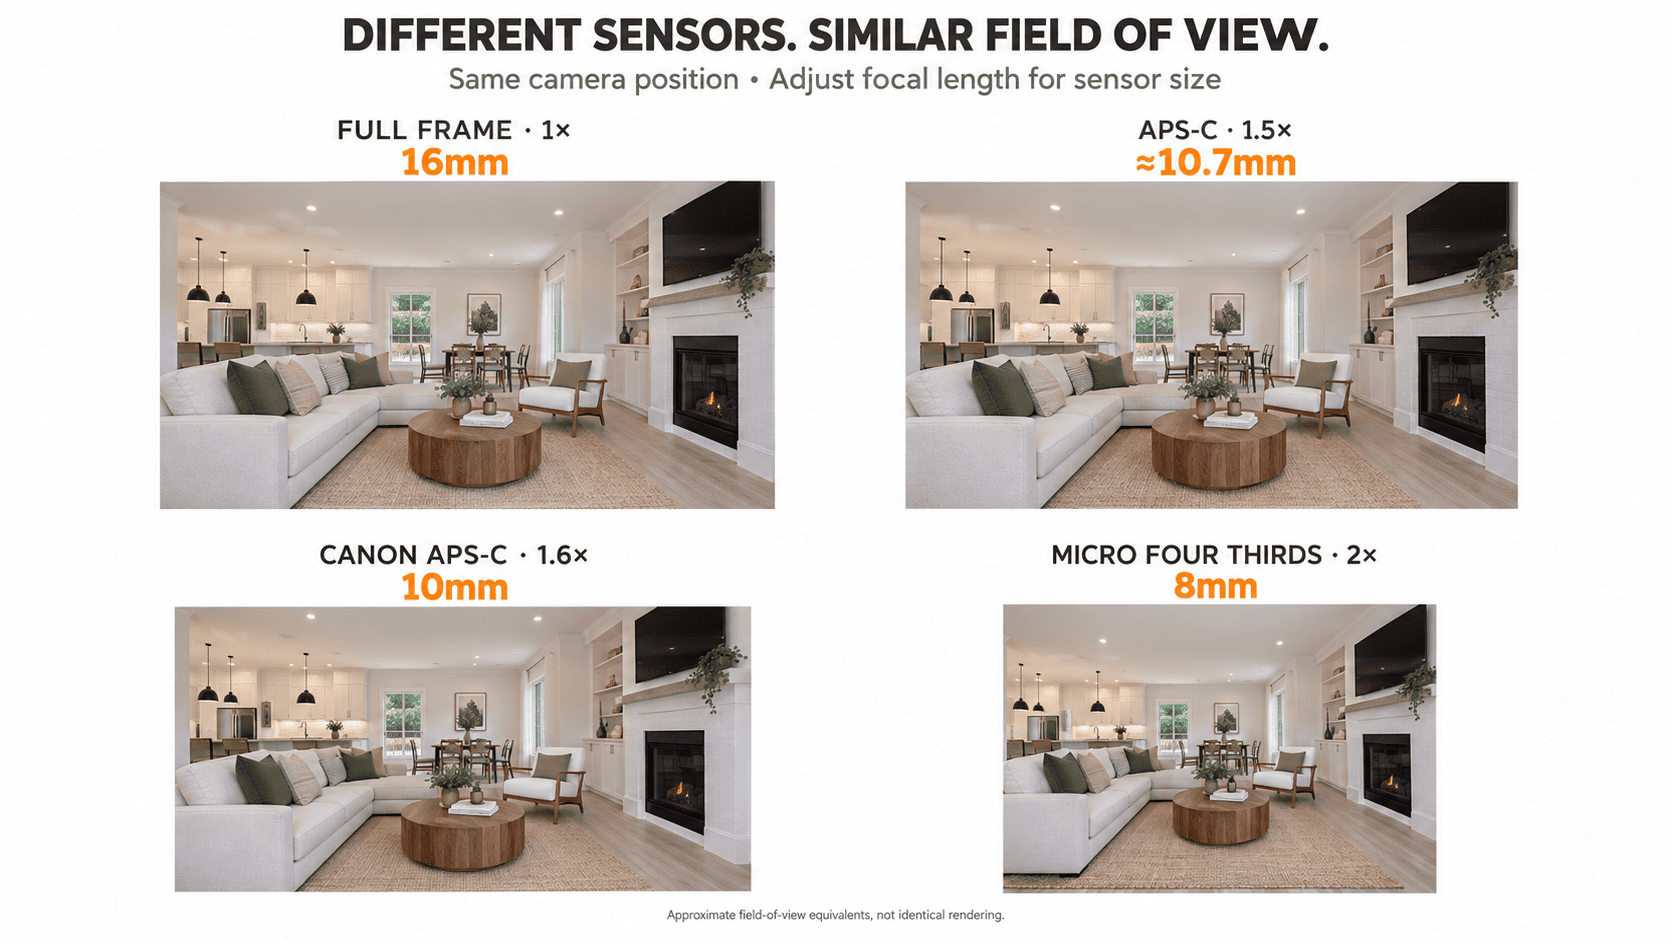
To compare camera systems, use full-frame-equivalent focal lengths as a reference for field of view. The number printed on the lens remains its physical focal length.
The basic calculation is:
Full-frame-equivalent focal length = lens focal length × crop factor
The following values are rounded comparisons. They do not make different lenses identical in optical performance, depth of field or rendering.
|
Full-frame focal length |
Lens focal length on 1.5× APS-C |
Lens focal length on Canon 1.6× APS-C |
Lens focal length on 2× Micro Four Thirds |
|
14mm |
9.3mm |
8.8mm |
7mm |
|
16mm |
10.7mm |
10mm |
8mm |
|
20mm |
13.3mm |
12.5mm |
10mm |
|
24mm |
16mm |
15mm |
12mm |
|
35mm |
23.3mm |
21.9mm |
17.5mm |
|
50mm |
33.3mm |
31.3mm |
25mm |
Full-Frame Focal Lengths
On a full-frame camera, the focal ranges covered in this guide apply directly. A 16–35mm zoom lens accommodates a wide variety of interior compositions while offering the flexibility to tighten your framing when needed.
A lens starting at 14mm provides extra coverage inside tight spaces; however, this ultra-wide perspective should be selected for specific shots rather than used as a default for every room.
Evaluate whether a lens is wide enough based on the final edited images, as optical and perspective corrections will alter the usable edge area of the frame.
APS-C Focal Lengths and Crop Factor
Many Nikon, Sony and Fujifilm APS-C systems use approximately a 1.5× crop factor, while Canon APS-C commonly uses 1.6×. Nikon explains its format relationship in the DX and FX guide, and Canon illustrates equivalent focal lengths in its lens-selection guidance.
For example, 10mm on Canon APS-C gives a field of view approximately equivalent to 16mm on full frame. On a 1.5× crop body, 12mm corresponds to approximately 18mm.
An 18mm APS-C kit lens gives a view comparable to approximately 27–28.8mm on full frame. It can work for exteriors and larger spaces but may be restrictive in compact interiors.
Read more: Full Frame vs Crop Sensor for Real Estate Photography
Micro Four Thirds Focal Lengths
Micro Four Thirds uses an approximately 2× crop factor for standard equivalent-focal-length comparisons. An 8–12mm range therefore corresponds to approximately 16–24mm on full frame.
For example, the official OM SYSTEM lens catalog lists its 9–18mm lens as providing an 18–36mm full-frame-equivalent range.
Sensor aspect ratio also affects framing. Micro Four Thirds commonly uses 4:3, while many full-frame and APS-C cameras use 3:2. Equivalent focal lengths are a useful reference, but matching horizontal and vertical coverage may require checking the actual composition and output crop.
How Focal Length and Camera Position Affect Room Proportions
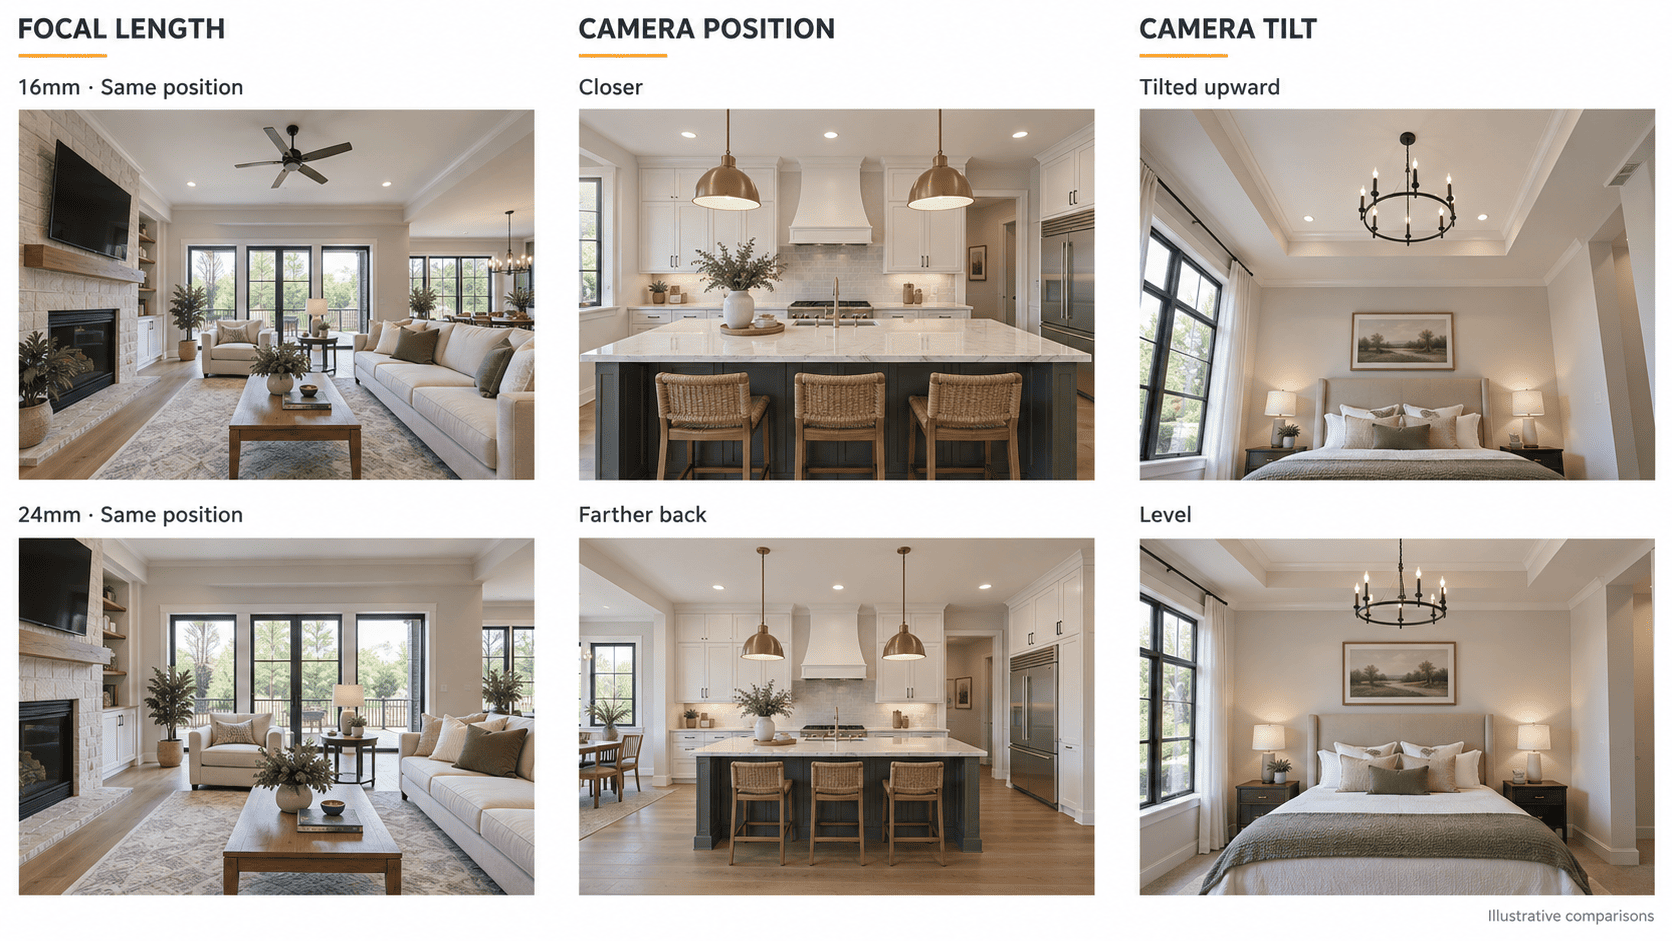
Three effects are often grouped under wide-angle distortion: perspective related to camera position, stretching near the edges of wide rectilinear images, and optical lens distortion.
Separating these effects helps you determine which factors require adjustment on-location during capture and which issues can be resolved in post-production.
Field of View and Camera Distance
Focal length determines the field of view on a given sensor, whereas camera placement dictates the relative perspective between foreground and background objects.
If you capture a room from the exact same position at 16mm and 24mm, the second shot simply displays a narrower field of view. The underlying perspective does not alter merely by turning the zoom ring.
However, if you step back to maintain a similar framing at a longer focal length, the perspective shifts because the camera position has changed.
This distinction is crucial when elements like a kitchen island or sofa appear unnaturally oversized. Often, the most effective fix is physically moving the camera rather than adjusting the focal length from a stationary position.
Edge Stretching and Foreground Objects
A rectilinear lens for interiors uses a projection that keeps straight scene lines straight in the ideal image, but objects near the edges of a very wide view can still look stretched. Actual lenses may also introduce optical distortion.
Camera placement causes nearby objects to appear substantially larger than those further away, an effect magnified when combining a close foreground subject with an ultra-wide field of view.
Whenever possible, avoid positioning key furniture pieces directly along the frame boundaries. If a foreground element becomes overly dominant, adjust your camera angle, tighten the framing, or recompose to reduce its visual emphasis.
Optical Distortion and Converging Verticals
Optical distortion can cause straight lines to curve outward or bow inward. Supported lens profiles can reduce barrel or pincushion distortion. Inspect the corrected image for remaining curvature, edge detail, and changes to framing.
Converging verticals result from camera orientation relative to the building. Their appearance also depends on framing; focal length alone does not cause the convergence.
Adobe distinguishes lens corrections from perspective adjustments in its Lightroom Classic Upright guidance. Apply suitable lens corrections, then review geometry and alignment.
A 14 mm rectilinear lens is not automatically a fisheye. Fisheye and rectilinear lenses use different projections; focal length alone does not determine whether walls curve. For conventional listing images, a rectilinear wide-angle lens is usually more practical. A fisheye lens for real estate photography is more relevant to specialized panoramic workflows than standard room photographs.
Read more: Step-by-Step Tutorial for Editing Real Estate Photos in Lightroom
How to Choose the Right Focal Length on Location
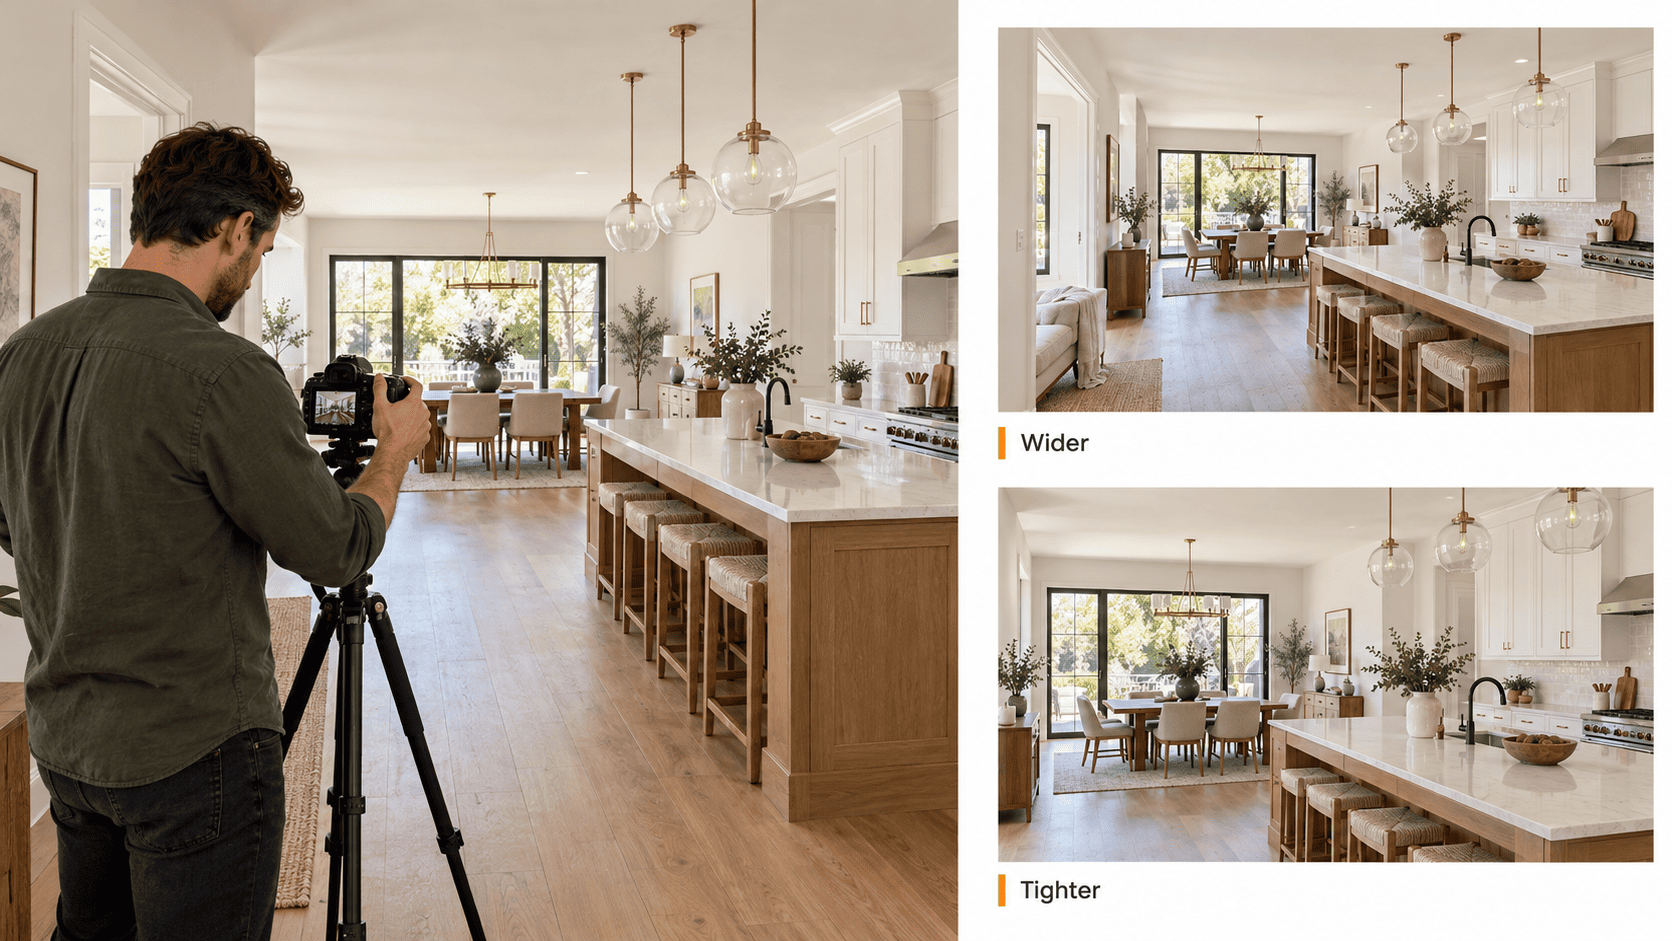
A repeatable process is more useful than memorizing one preferred number. Begin with the purpose of the photograph, select a camera position and then refine the field of view.
Choose the Camera Position First
Identify what the image needs to show, such as the connection between the kitchen and dining area, bedroom storage, or access to a patio.
Choose a position that shows that relationship without foreground obstructions. Before adjusting the zoom ring, check mirrors, door frames, and furniture for reflections and distracting edges.
Keep the camera level whenever the composition permits. Adjust camera height to suit each room’s layout rather than using one fixed height throughout the property.
Compare Wider and Tighter Compositions
From a suitable position, capture a wider and a tighter view. On a full-frame camera, comparing 16 mm and 20 mm can help you decide whether the extra coverage adds useful information.
For a useful test, distinguish between two approaches: changing focal length from a stationary position versus moving the camera to maintain a similar framing. The former illustrates differences in coverage, while the latter also alters the underlying perspective.
Pay close attention to what enters and leaves the frame. If the wider option merely adds empty floor space or stretched furniture, the tighter composition may communicate the room more effectively.
Keep Important Features Away from the Frame Edges
Before executing your final set of shots, carefully inspect the frame edges. Watch for awkwardly cropped elements (such as cabinetry), partial door frames, oversized light fixtures, or unnaturally stretched furniture.
Often, a minor adjustment can resolve an issue without using a wider field of view. Try shifting the camera position or refining the composition so key details sit more naturally within the frame.
Avoid crowding every selling feature into one image. Additional angles can explain the layout more clearly when each image shows a distinct feature or connection.
Check Coverage After Lens and Perspective Corrections
Lens corrections, perspective adjustments, and output cropping can change the usable edges of the image. Inspect the final output to confirm that important features remain in the frame.
Leave a comfortable margin around key subject features, but avoid shooting excessively wide just as a safety net. Over-correcting extreme perspective distortion in post-processing stretches pixels and reduces overall fine detail.
During test shoots, process representative frames using your standard export settings. Verify whether the final corrected output retains essential cabinetry, window edges, and structural room connections.
For HDR bracketing, maintain strict consistency in composition, focal length, and focus distance throughout each bracketed sequence. Shift your framing only between different shot setups, never within the same exposure bracket.
Read more: Step-by-Step Real Estate HDR Photo Editing Tips
Frequently Asked Questions
Is 14mm Too Wide for Real Estate Photography?
Not necessarily. On full frame, 14mm can help in tight interiors, but it requires careful camera placement and attention to frame edges. Use it when the composition needs that coverage rather than for every room.
Is 24mm Wide Enough for Real Estate Photography?
Sometimes. On full frame, 24 mm can work well in larger rooms and exterior views when camera distance permits. It may be restrictive in compact bathrooms or bedrooms. On APS-C, 24 mm provides a narrower view, approximately equivalent to 36–38.4 mm on full frame.
Is 20mm Wide Enough for Small Rooms?
Sometimes, but not always. On full frame, 20mm may work from a suitable doorway or in a moderately sized room. A compact bathroom may require wider coverage. On APS-C, 20mm produces a considerably narrower view.
Can You Use 35mm or 50mm for Property Photos?
Yes. On full frame, these focal lengths can be useful for architectural details, tighter exterior views and interior compositions with sufficient working distance. They usually cannot replace a wide-angle lens for complete compact-room coverage.
Should Every Room Be Shot at the Same Focal Length?
No. Rooms differ in size, access and furniture placement. Consistency should come from clear compositions, controlled geometry and coherent editing rather than forcing every image to use the same number of millimeters.
Does a Wider Lens Automatically Make a Room Look Larger?
No. A wider lens includes more of the scene from a given position. Perceived spaciousness also depends on camera distance, foreground objects and composition. Moving close to furniture and shooting very wide can exaggerate the apparent distance between near and far parts of the room.
Conclusion
The best focal length for real estate photography is the one that explains the space without unnecessary visual exaggeration. Approximately 16–24mm on full frame is a useful interior starting range, with wider coverage for confined spaces and longer focal lengths for selective compositions.
Translate those ranges for your sensor, choose the camera position first and inspect the image after correction. A stronger gallery comes from adapting to each room rather than relying on one focal length throughout the property.
Rotider supports the next stage through real estate photo editing, helping photographers prepare consistent exposure, color and architectural alignment across the final gallery. Clear capture and carefully reviewed post-production work together to produce professional listing images.




.png)
.png)